How do I connect my trainer, heart rate monitor, etc?
Zwift Support: Connecting Your Devices for Cycling
ANT+
ANT+ devices are not supported.
Bluetooth
Wine does not fully support Bluetooth Low Energy yet. Instead, you can use your phone as a bridge to connect your bluetooth devices to Zwift.
- Open the Companion App on your phone (don’t forget to enable bluetooth!)
- Start Zwift on your PC
- The Companion App should show that it is connected to Zwift
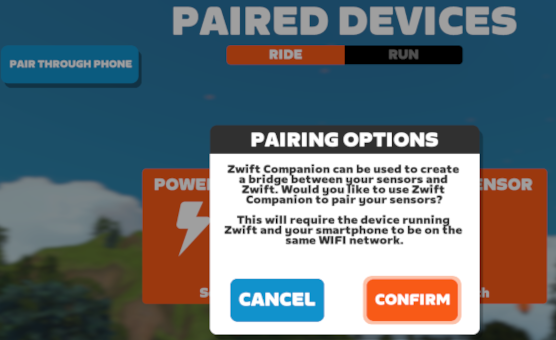
- On the Zwift pairing screen, select PAIR THROUGH PHONE
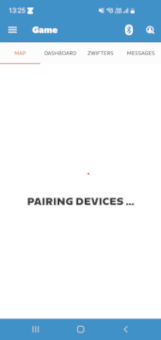
- The Companion App should show PAIRING DEVICES…
- You can now select your bluetooth devices on the Zwift pairing screen
For example, your Wahoo Kickr and Apple Watch connect to the Zwift Companion App on your iPhone, then the Companion App connects over Wi-Fi to your PC running Zwift.
If you are having troubles trying to get Zwift to connect to the Zwift Companion App, read Wi-Fi Device Not Detected.
Direct Connect
If you are using a direct connect (Wi-Fi or ethernet) enabled trainer, you do not need the Companion App. Setting the NETWORKING configuration option to NETWORKING="host" will allow Zwift to discover your device and connect to it directly.
If you also need to connect bluetooth devices such as a heart rate monitor or the Zwift Ride controllers and your trainer can act as a bridge, you can connect your bluetooth devices through your trainer. If your trainer does not have bridge functionality, you can connect your bluetooth devices through the Companion App. Examples of trainers that can act as a bluetooth bridge are the Wahoo Kickr Core 2, Wahoo Kickr Bike Pro and the JetBlack Victory.
For example, your heart rate monitor and Zwift Ride controllers connect to your Kickr Core 2 over bluetooth, then the Kickr Core 2 connects over Wi-Fi to your PC running Zwift.
If you are having troubles trying to get Zwift to connect to the Zwift Companion App or discover your direct connect enabled trainer, read Wi-Fi Device Not Detected.
USB
If you are using a trainer that can be plugged in directly to your PC with a USB cable, you do not need the Companion App. Follow the instructions below to allow Zwift to discover your device and connect to it directly. An example of a trainer that has this capability is the JetBlack Victory.
-
Allow rootless access to the USB device by creating a udev rule:
foo@bar:~$ sudo echo 'ACTION=="add|change", SUBSYSTEM=="usb|tty", ATTRS{idVendor}=="393c", ATTRS{idProduct}=="0006", MODE="0660", GROUP="dialout", SYMLINK+="jetblack_victory", TAG+="uaccess"' > /etc/udev/rules.d/71-jetblack-victory.rules foo@bar:~$ sudo udevadm control --reload-rules foo@bar:~$ sudo udevadm triggerACTION=="add|change– Trigger the rule if a device is added or its properties changed.SUBSYSTEM=="usb|tty"– We are only interested in USB and tty devices.ATTRS{idVendor}=="393c"– The USB vendor identifier. If you are not using a JetBlack Victory, change this to your trainer’s USB vendor id.ATTRS{idProduct}=="0006"– The USB product identifier. If you are not using a JetBlack Victory, change this to your trainer’s USB product id.MODE="0660"– Allow read and write access to the device owner and assigned group.GROUP="dialout"– The group to assign to the USB device. This value is different for most Linux distributions. To figure out the correct group, look atls -l /dev/tty*. On Fedora the group isdialoutorplugdev, on Arch Linux the group isuucp. Also make sure your user is a member of the correct groupsudo usermod -aG dialout $USER. Adding a group is not needed if your system supports theuaccessmechanism.SYMLINK+="jetblack_victory"– Your device is assigned a filename such as/dev/ttyACM0. It is possible that your device gets a different number, for example/dev/ttyACM1. If you are not using a JetBlack Victory, it is also possible that your device is recognized as/dev/ttyUSB0. The number can also change if you have multiple USB devices connected. To make it easier to refer to the device, you can assign an extra name to it. You can then refer to your device using/dev/jetblack_victoryinstead of having to figure out the correct filename.TAG+="uaccess"– Make the device accessible to all logged-in users./etc/udev/rules.d/71-jetblack-victory.rules– The filename to use for the udev rule. For theuaccesstag to work, the number at the start of the filename has to be less than 73. It is recommended to use 71.
-
Pass the USB device to the netbrain/zwift container using the CONTAINER_EXTRA_ARGS configuration option:
CONTAINER_EXTRA_ARGS=(--device=/dev/jetblack_victory) -
On the Zwift pairing screen, use the USB option when connecting your trainer. Read the JetBlack Victory Adds USB Connection Support Zwift Insider article for detailed instructions.
If you also need to connect bluetooth devices such as a heart rate monitor or the Zwift Ride controllers and your trainer can act as a bridge, you can connect your bluetooth devices through your trainer. If your trainer does not have bridge functionality, you can connect your bluetooth devices through the Companion App. Examples of trainers that can act as a bluetooth bridge are the Wahoo Kickr Core 2, Wahoo Kickr Bike Pro and the JetBlack Victory.
For example, your heart rate monitor and Zwift Ride controllers connect to your JetBlack Victory over bluetooth, then the JetBlack Victory connects over USB to your PC running Zwift.